
Wondering what to do with all your Instagram stories after you’ve posted on Insta? I admit I do spend some time making them my own, so it’d be a shame to let them vanish within the cloud somewhere. Read on to find out how to actually save them to create something beautiful!
Love creating instagram stories but wish you could make something more tangible and everlasting with them? Sure, it’s fun to post these pictures on the ‘gram for the whole insta-world to see (for a mere 24 hours…), but what happens to them after the fact? Do they just sit on your phone like the rest of your photos? Probably. Do you even SAVE THEM to your camera roll?! If not, RIP insta stories. Well, my friends, I’ve got the perfect solution to get those fanciful insta stories off your phone and into the real world. Enter, the memory planner.
Sorry in advance for the low quality, horribly angled photos – there’s a reason I shoot travel and landscapes instead of fancy flat-lays…. 🙂

Psst: You don’t necessarily need to ONLY use instagram stories for this project (and plain old regular photos are absolutely fine). I prefer insta stories primarily because I’ve already included some details on them (temperature, location, feelings, activity, a fun yet meaningful sticker, etc) and have fancied them up quite a bit. Plus, I add some captions directly onto the photo, which adds in even more deets.
So why am I doing this?
[divider style=”thin” title=”” text_align=””]A little background:
I used to absolutely love scrapbooking in the traditional sense. I bought albums and all the pretty paper and cardstock and stamps and foils. Give me all of it. And OH the STICKERS! Never enough stickers! (Lisa Frank, anyone?! That was wayyy back in the day, but never good enough for my scrapbooking layouts.) The high I got once (finallllyyy) finishing a page – absolutely f**king priceless. I gave myself an imaginary gold star every time I actually finished a page (currently at 7 stars, whoops). But I’d second guess my creativity to the max and constantly compare myself to all those scrapbooking guru’s out there (which I was not).
Traditional scrapbooking can be super exciting with all of the material options, but this only means one thing: The Dreaded White Page of infinite possibility. Ya know, every single time you start a new page there’s absolutely NOTHING on it. And because of this, scrapbooking in the traditional sense can be super overwhelming. Who else stares at the blank white page and has a minor panic attack no clue where to begin?
And keeping the book looking semi-put together and not a whole mish mash of random paper scraps and stickers? Well, that’s a whole other thing. Sure, you can buy monthly pre-coordinated kits, and while they are downright gorgeous, those can get pretty darn expensive. And without all those fancy kits? Scrapbooking can get kinda tedious and sad.
That’s what happened to me. I’d get all excited to start a scrapbook, finish one page after an hour or so (two pages if I was lucky), and get discouraged because I still had about a million other photos I wanted to include. Each page took me forever to make, and because of my unfortunate (at times) perfectionist qualities, it’d take me over a year to make a scrapbook of a week-long trip #majorfail. I’ve since learned that the traditional scrapbooking method just doesn’t work for me, so I started documenting my life in a different way (which I’ll teach you in a just a few moments!).

And now? I can finish documenting an entire month of my life in just a few hours! And instead of only including major trips and travels, I can even include all the random everyday moments too (like when my nephew sleeps over and we make homemade chocolate chip pancakes, taking silly Snapchat selfies with my grandma, and taste testing 20 flavors of ice cream, for example). It’s the little things in life, you guys, that sometimes usually mean the most. I’m making an effort this year to appreciate the little moments in my normal day to day, and have found this scrapbooking method to be just the place to document all the random photos I take.

So how’s that? Including more everyday life moments (including those epic travel experiences) in less time? Fine by me!
[divider style=”thin” title=”” text_align=””]Curious? Let me explain!
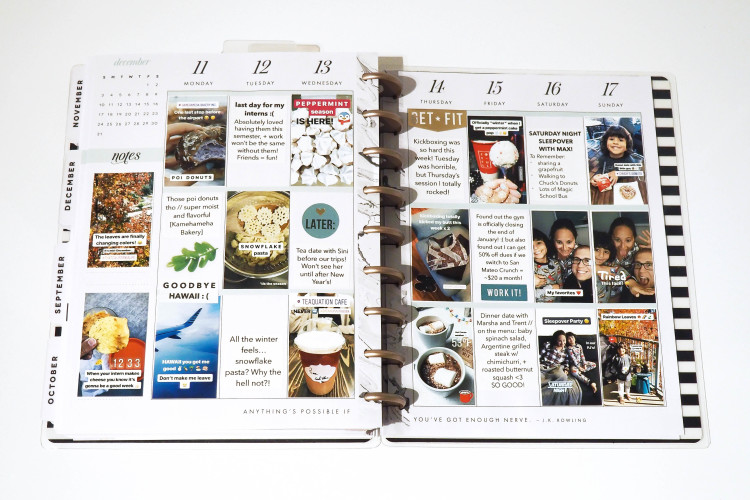
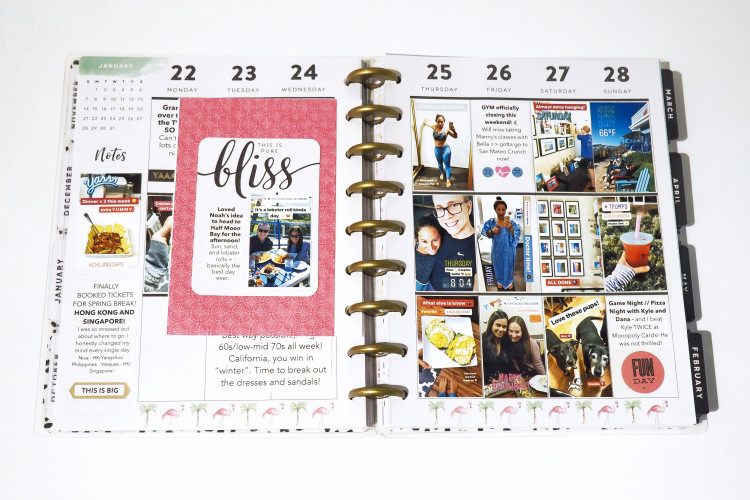
Instead of making a scrapbook highlighting only a few specific moments of your life (travels, graduation, births, weddings, etc), this book will help you document EVERY SINGLE DAY of your life.
Sounds exhausting, doesn’t it? It doesn’t have to be.
The book we’ll use already has designated spots for photos and journaling to some extent, so say goodbye to those (lack of) creativity-induced tears. With that being said, I still play around with dimensions and layouts every once in a while, and you’ll see what works for you after documenting a few weeks.


What You’ll Need:
The Absolute Necessities:
- THIS Vertical Memory Planner, Medium/Standard or Large (I use Medium/Standard). There are multiple styles to choose from, each one having a different cover design, monthly dividers, and coordinated fonts. My favorite styles include: “flamingos” (super tropical and what I’m currently using), “marble” (so classy and what I used last year), “modern romance“, and the classic “stay positive”. They sometimes sell out fast because they are meant to be used as traditional planners and only come out during particular months of the year. Being that this year just started, there’s still quite a few styles to choose from (however, there are usually some year round, just not as many options). MAKE SURE YOU BUY THE VERTICAL OPTION as this scrapbooking method won’t work with the horizontal design! Most options are in fact Vertical, just be sure to double check by looking at the photos. Also, make sure to buy the CORRECT YEAR! There are still some old planners left for the 2016/2017 year, so be sure to buy the 18 month July 2017- December 2018 planner. I only do one full year in each book, and therefore take out the first 6 months, but the choice is yours!

- Glue Sticks or rubber cement (I use glue sticks but have friends who swear by the cement stuff)
- Double Sided Tape (yes, in addition to either a glue stick or cement)
- Scissors (love these!) and/or Paper cutter
- Photos, resized to 1.5 inches wide by 2 inches high (I’ll explain how to resize them below)
The Optional Extras:
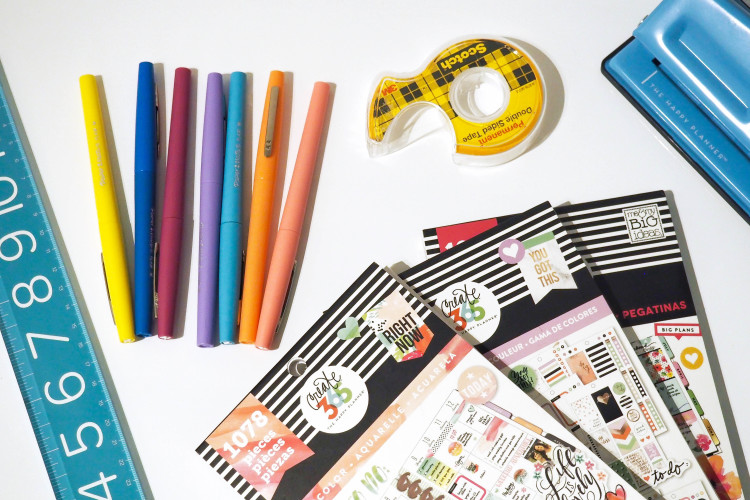
- Printer/Computer
- Colored pens (preferably something that will not bleed through the paper, like these, these, or these.)
- Disc Puncher
- Stickers: These sticker packs are coordinated with the size of the memory planner, and are designed to fit exactly within the borders of the layout. I have a bunch of packs, but I tend to gravitate towards these, these, these, and these (fitness). I recommend only buying 1-2 at first as they can be semi-expensive. Make sure when buying you only order packs that are designed for the medium (standard), and NOT mini or BIG.
- Pocket Pages
- Scrapbook Paper
The Process: What To Do with Your Instagram Stories (After Posting to Insta)
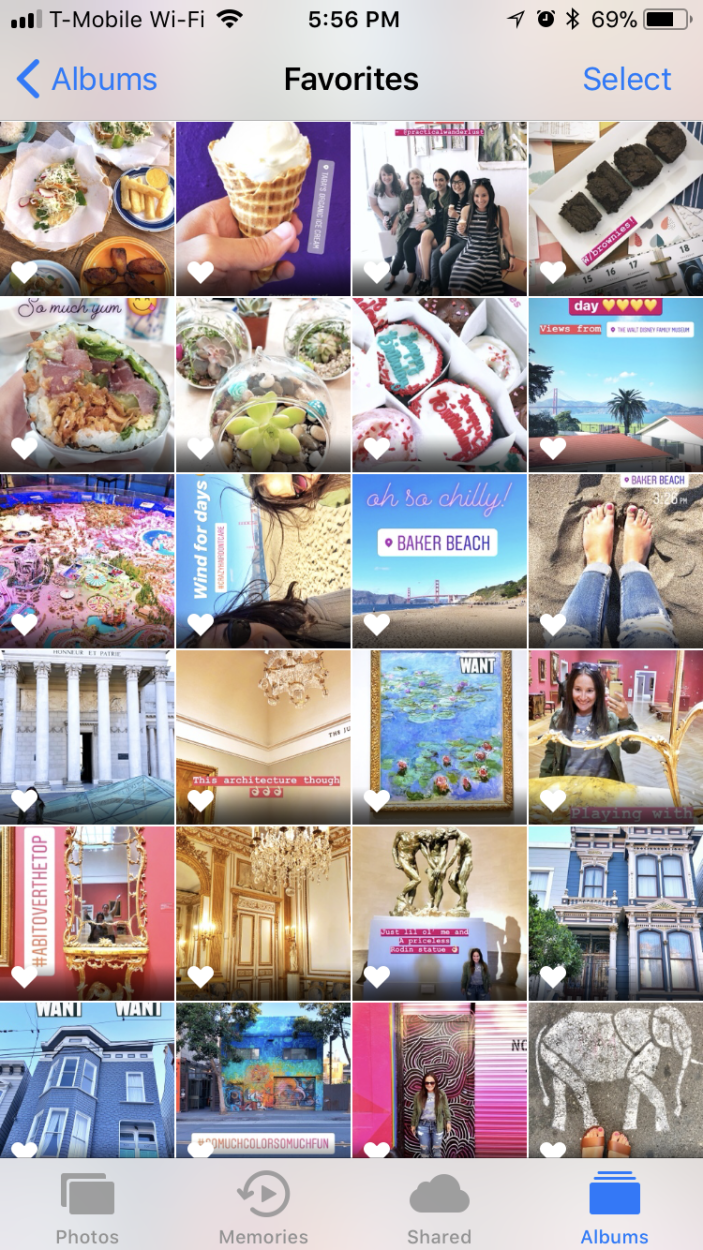
1. Make your insta stories like you normally would, and SAVE them to your camera roll! If you forget, you can always go back into your instagram story to save them as individual photos (not story) by clicking on the three little dots in the bottom right corner, but remember, they’ll be gone in 24 hours. I like to favorite them to make them easier to find later on.
2. Write short sticky notes to affix to your planner of what photo goes on what date to help keep you organized. (You can skip this step if you’ll be memory planning weekly, but it’s a good habit to get into just in case you miss a week or two). Also- you might as well jot down any specific memories you want to document now too- (I do this throughout the week because I have the absolute worst memory).
3. Resize your instagram stories! The memory book I use has boxes with dimensions of 1.5×2 inches, so I resize my photos to exactly this size so they fit neatly in the boxes. There are a few ways to go about this:
- COMPUTER: You can either send them to your computer via airdrop or email and resize using word/pages or other photo editing program like photoshop.
- CELL PHONE: Resize the photos directly on your phone using an app. There are a million collage apps to choose from, but I use PicStitch because after you pay the .99 cents, you can create collages of your own dimensions (which you’ll need to do in order to make the perfect sized photos). I hate paying for apps but this makes it super easy. Making collages are absolutely perfect for this process because it allows you to print multiple pictures on one 4×6 photo, saving you lots of money in the end.

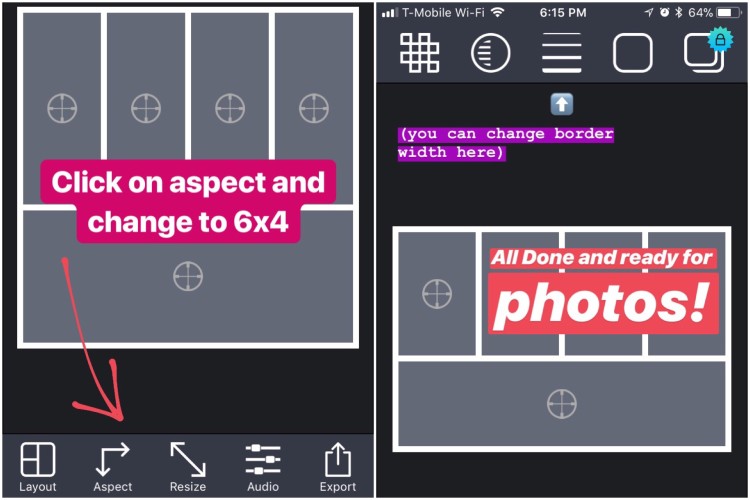
- How to set up Exact dimensions of collages on PicStitch:
- open a new layout (design with scissors)
- resize: divide vertically 1 time (50%), divide top half into fourths (divide twice) and save – sorry for miss mosh of the steps in the photo, I tried my best!
- change aspect to 6×4
- you can alter the borders by either buying the borders pack for .99 cents or by watching a free trial = ad (which you need to do each and every time you open the app).

- Psst – you can make a 3 x 2inch photo if you’ve got a horizontal photo you don’t want chopped off and made vertical. You can also make a 4.5 by 2 inch photo for a panoramic shot. Note that you’ll need to create separate collage formats for these. By doing some math on a 4×6 photo and knowing the size of the boxes are 2 x 1.5 inches, you can make photos as long as you’d like to fit within the boxes.
*NOTE: Each day of the memory book has space for up to 3 1.5×2 inch photos. Because of this, I try to limit the number of photos for each day up to at most 3, however, if I have lots more I’ll make an insert (explained more in depth below). If you plan on doing any journaling for the day, I suggest you print out max 2 photos per day.
4. Print out your photos at a nearby 1-hour photo shop, like CVS or Walgreens. I send the collages directly to the shop via an app, but you can print them out at a photo kiosk as well by going into the store. Of course you can print the photos at home if you have a fancy photo printer with photo paper. Alas, I do not, and find that the quality of the Walgreens photos is sufficient enough.
5. Cut out the photos you intend to tape into the premade boxes, which will likely be all. You can use a paper cutter in leu of a scissor if you want, but I feel like I have more control with the latter.
6. Lay out the photos in their intended spots in your memory planner. Remember- you don’t need to put them perfectly inside the boxes – that’s your choice! I sometimes mix them up by spacing them out a bit differently, and it looks really cool! It’s all about experimenting and seeing what style you like!
7. Use double sided tape to secure the photos in their spots.
8. Use the leftover blank boxes for any journaling you may want to do! You can do this either by hand or by typing on the computer (in boxes of 1.5×2 inches) and printing and cutting these out. I then use a glue stick to affix these short blurbs into their intended spaces! I used to hand write but found I didn’t have enough space to write all that I wanted so I picked my favorite font and now use text.

9. Add in any stickers to fill the white spots (personal preference) and/or any extra inserts

10. You’re DONE! Yay!
[divider style=”thin” title=”” text_align=””]TIPS:
- Post-it every week. Even if you don’t have time to resize your photos/print them, make little post-its of what you did every day. You can keep it SUPER SIMPLE (for example: chili for dinner, boba with Taylor, babysat nephew) just so you remember what happened throughout the week. It gets difficult if you have to look back through photos taken weeks and weeks ago. The more up to date you keep this and more detailed you make it, the more information you’ll have when you eventually put the whole thing together. If you want to remember anything specific about a moment (what someone said, a specific thing that was not photographed, etc), make sure to briefly jot it down before you forget!
- Don’t feel like you need to start this process on January 1st. Any date is a good time to start! And if you have tons of photos/insta stories laying around, you can even backtrack a bit and document weeks/months in the past. My suggestion: don’t get too caught up on documenting the past, as it’s better to just move forward and relish in the new memories you’re making.
- It doesn’t have to be perfect. You’ve got 52 weeks to do, and if attempting to make it 100% perfect stresses you out, you can guarantee the entire year will never get finished!

- Attempt to print out photos at least once a month. Anything less and it gets too overwhelming! At first I started documenting every single week, then I moved to bi-weekly, and once did an entire month at once. However, you can guess by the time I got around to actually doing the month, I had forgotten all the little moments I wanted to remember. And because of this, post-its come in super handy.
- You can include anything you’d like. Don’t feel like you can’t include a photo if you didn’t post it to instagram. For example, when there’s something a bit too personal I don’t want to share on an insta story but want to include in my memory book, I create an insta story like I normally would, but instead of sharing it to my story, I simply save it to my camera roll to print out later.

Ideas of things to take photos of:
Yes, every week won’t be the most exciting. That’s just how life is. You can guarantee that all my 52 weeks of the year aren’t filled with photos of Iceland, Hawaii, Thailand, and Japan (although some of them are!) Make note of the little things in life. Who you saw that day. What you wore. What you ate. What the weather was like. A song on repeat. Really, anything. When you don’t have anything MAJOR going on in your life, this is the time to remember those little moments. No matter how insignificant a day may seem, I always find something to take a photo of. These are the memories you’ll want to remember (and/or laugh at) in the years to come.
- Still don’t think you’ll have enough photos? Try a Photo Challenge of the Week, where you aim to take a photo with a particular theme every day of the week (sticking to weekdays is perfectly acceptable as well). A few ideas of mine which I haven’t fully executed just yet but want to try soon:
- Patterns in nature
- My shoes/from where I stand
- Dinner
- Black and white selfies
- Rooms of your house
- A walk in your neighborhood
- Signs of spring/winter/fall/summer
- Silly selfies of your kids/students/husband/etc
- Things that make you happy
- Moments of gratitude
- Macro photos (super zoomed in)
- Photos from below (get down low and take photos from this angle)
- Interesting doors
- Shapes
- Things that come in pairs
- etc, etc, etc…….
- Have the opposite problem?! Too many photos you want to include? Create mini inserts like I do! A few ways to do this, but feel free to be creative!
- Use the disc puncher to punch directly into the photo (collage of photos or a standard 4×6 photo for when you have a photo you want larger than others) and put them in your planner.
- Don’t want to punch the actual photo? Punch a strip of cardstock (or scrap photo paper from other photo collages you already cut up), use double-sided tape to attach the photo and photo paper strip and put these directly into your planner!
- Use pocket pages to add in extra photos (come in different sizes with different number of slots for photos) – my new favorite.


Why I love this method of scrapbooking:
- Ensures you capture all of life’s little everyday moments, instead of just the major excitements like traveling
- Takes significantly less time. Once you get the hang of it, you’re able to complete an entire month in a few hours.
- Only requires a few materials, and therefore, not much money!

Leave a Reply